Bearish Three Outside Down
Updated Aug 26, 2026
- Signal
- Bearish Reversal
- Reliability
- High
- Rarity
- Common
- Confirmation
- Recommended
- Trend Position
- Uptrend Top
On this page
The Bearish Three Outside Down is a three-candle reversal pattern that turns a bearish engulfing pattern into a confirmed reversal signal. The first candle continues an uptrend, the second candle's real body completely engulfs the first candle's real body to the downside, and a third bearish candle closes even lower, confirming that sellers have taken control. Because it requires that extra confirming candle, it is generally regarded as more reliable than a bearish engulfing pattern on its own, and it appears often enough on daily charts to be a practical tool rather than a curiosity.
Recognizing the Pattern
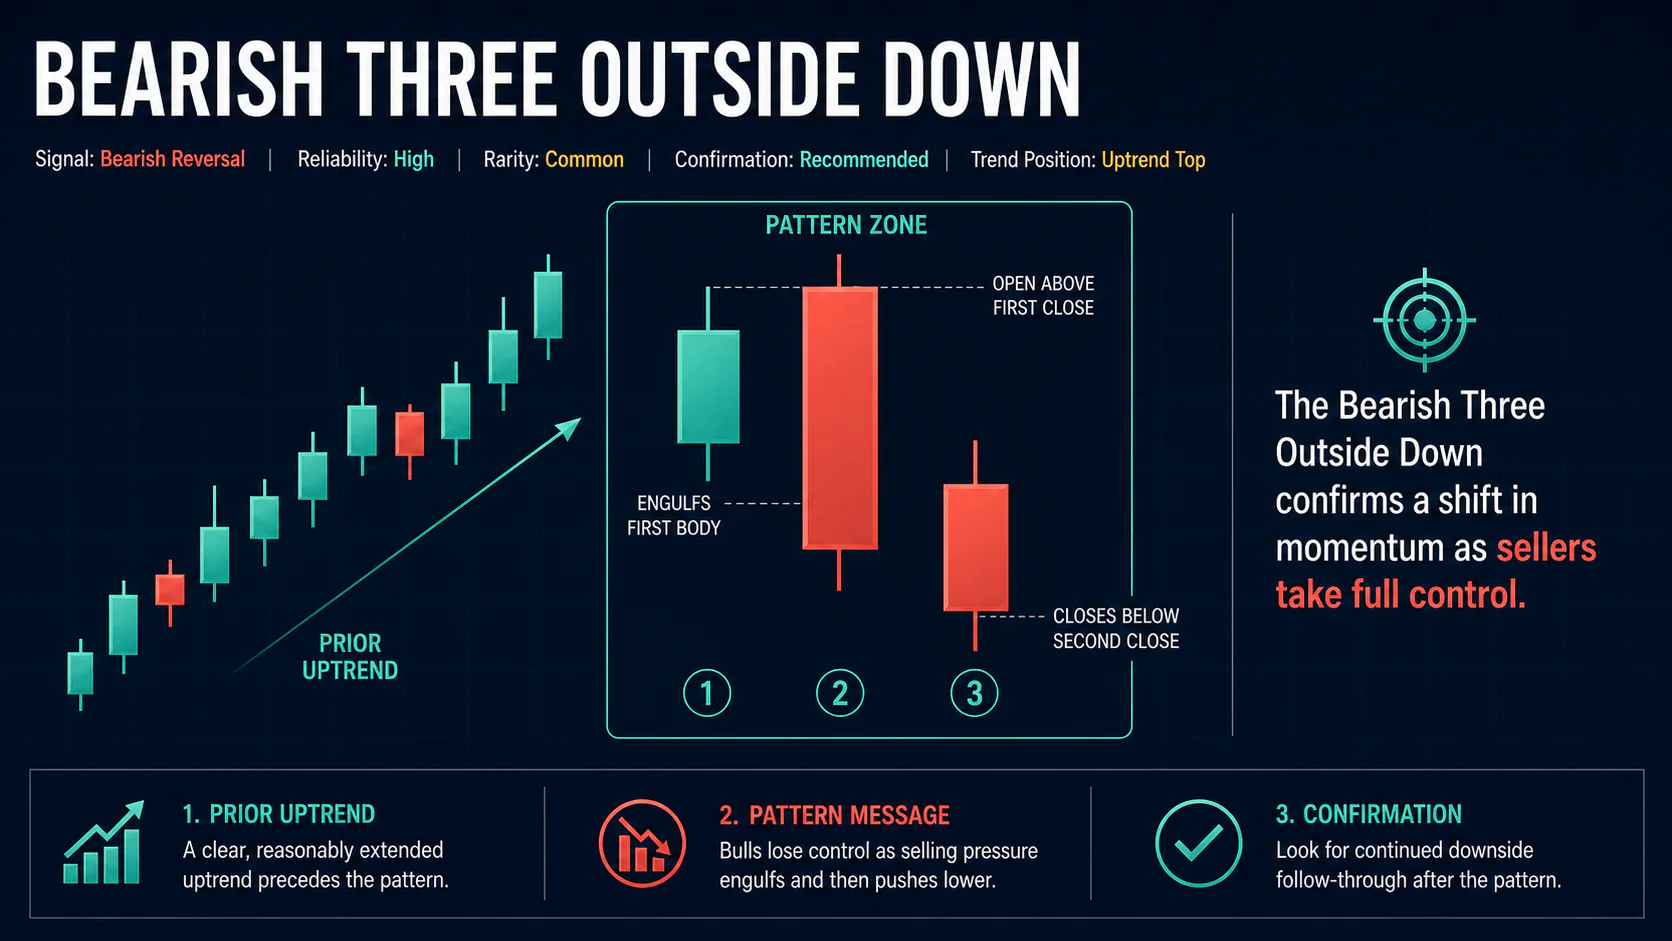
First candle: a solid bullish candle that continues the prevailing uptrend, often closing near its high.
Second candle: a bearish engulfing candle — its real body opens above the first candle's close and closes below the first candle's open, completely swallowing the first candle's body. The cleanest versions also engulf the shadows, but body engulfment is the defining requirement.
Third candle: a bearish candle that closes below the second candle's close, confirming that the engulfing move was not a one-session event.
The pattern only carries reversal weight after a clear, reasonably extended uptrend. Volume that expands on the engulfing candle and holds up on the third candle adds confidence, and formation at a well-known resistance level or round number strengthens the signal further. It's also worth noting where the pattern sits relative to the broader move — one appearing after a sharp, fast run-up carries different implications than one appearing after a long, gradual grind higher, since the former often reflects speculative excess that unwinds faster once sellers take control.
Quick Recognition Checklist
- Clear, reasonably extended uptrend precedes the pattern
- First candle is a solid bullish continuation candle
- Second candle's real body fully engulfs the first candle's real body
- Third candle closes below the second candle's close
- Volume expands on the engulfing candle
- Formation at or near a resistance level adds confluence
Notable Variations
A third candle that opens with a gap down from the second candle's close is a stronger version, since it shows sellers didn't even wait for a retest before pushing lower. An engulfing candle with a long upper shadow — showing bulls tried and failed to hold the open — also tends to precede more reliable follow-through.
Patterns where the engulfing candle also swallows the first candle's shadows, not just its real body, tend to mark a more forceful shift in control than versions with only body-level engulfment, since the entire prior session's trading range has been erased.
Market Psychology
The pattern plays out across three distinct phases, moving from bullish complacency to a decisive and confirmed handoff to sellers.
First Candle: The Final Push
- Buyers extend the uptrend, often closing the session near its high
- The advance can mark the exhaustion point of the immediate rally
Second Candle: The Pivot
- Sellers open above the prior high, absorb residual buying, and drive the close below the prior open
- The previous session's gain is erased in a single move, triggering stops along the way
- Volume often expands noticeably as the shift in control unfolds
Third Candle: Confirmation
- Continued weakness removes doubt that the engulfing session was a one-off
- Sellers, not buyers, are now setting the pace
Trading the Pattern
Entry
The standard entry is at the close of the third candle, once the pattern is fully formed. Traders willing to accept more risk for a better price can enter during the third candle itself if it is clearly extending the prior session's weakness with reasonable volume; waiting for a break below the third candle's low is the more conservative alternative.
Stop-Loss
A stop above the engulfing candle's high is the standard placement, since a move back above that level undermines the entire premise of the pattern. Traders using the whole three-candle range for context sometimes place stops above the pattern's overall high instead, trading a wider stop for fewer false exits.
Profit Targets
Reasonable targets include the next meaningful support level, or a projection of the three-candle pattern's total height measured down from the third candle's low. Scaling out at intermediate support levels while letting a portion of the position run is a common way to manage the trade.
Confirmation and Indicator Confluence
The pattern gains credibility when it coincides with an overbought RSI reading, typically above 70, a bearish MACD crossover, or resistance from a major moving average, prior high, or trendline.
Context beyond the indicators matters as well: a round-number resistance level, a well-tested Fibonacci retracement, or alignment with resistance visible on a weekly chart all add weight to the reversal thesis. A sector or peer group that is already showing signs of relative weakness ahead of the individual pattern is another useful piece of corroborating evidence. None of these are required for the pattern to be valid, but their presence makes the signal more compelling and can help filter out weaker setups from genuinely high-quality ones.
Common Mistakes
- Accepting partial engulfment — if the second candle's real body doesn't fully cover the first candle's real body, it isn't a true engulfing pattern.
- Trading the pattern without a clear preceding uptrend for it to reverse.
- Entering before the third candle confirms, which skips the step that separates this pattern from a plain bearish engulfing.
- Placing stops at obvious levels, exactly at the engulfing high, where minor volatility can trigger them unnecessarily.
- Ignoring volume on the engulfing candle, which is one of the better indicators of whether the move has real participation behind it.
- Treating every high-reliability label as a guarantee — even strong patterns fail, so position sizing and stops still matter.
- Setting profit targets that ignore nearby support levels or broader market structure.
- Confusing this pattern with a Three Inside Down — the two share a similar three-candle shape but start from a different second-candle structure (engulfing versus harami).
FAQs
How is this different from a plain bearish engulfing pattern?
A bearish engulfing pattern is only two candles and is unconfirmed. The Three Outside Down adds a third bearish candle that closes lower still, providing confirmation that the engulfing move continues.
Does the engulfing candle need to cover the shadows too?
No — the formal requirement is real-body engulfment (open above the prior close, close below the prior open). Full-range engulfment, including the shadows, is a stronger but not required version.
What invalidates the pattern?
A close back above the engulfing candle's high suggests buyers have regained control and the reversal thesis has failed.
Is this a common pattern?
Bearish engulfing candles themselves are common; requiring a confirming third candle makes the fully qualified Three Outside Down somewhat less frequent, but still a regularly occurring signal on daily charts.
Should I wait for volume confirmation before entering?
It isn't mandatory, but a volume increase on the engulfing candle and continued elevated volume on the third candle both support the idea that institutional participants, not just short-term traders, are behind the move.
Why is this considered more reliable than a Three Inside Down?
The engulfing candle represents a more forceful, single-session shift in control than a harami's contained indecision, which is why traders generally treat the Three Outside Down as the higher-reliability of the two related patterns.
Can the pattern still work without a resistance level nearby?
Yes, but its odds improve with confluence. A Three Outside Down forming in open space, away from any obvious technical level, still reflects a genuine shift in control — it just lacks one of the reinforcing factors that separates an average setup from an exceptional one.
Conclusion
The Bearish Three Outside Down builds on one of the most recognizable candlestick signals — the bearish engulfing pattern — by requiring a confirming third candle before traders act. That extra step reduces the number of false signals compared to trading the engulfing candle alone, making this a relatively high-reliability reversal pattern when it forms after a genuine uptrend and at a meaningful resistance level. As with any pattern, its reliability still depends on proper trend context, sound risk management, and patience for the third candle to confirm.